Questions on Measuring Methods
Please click the questions below.
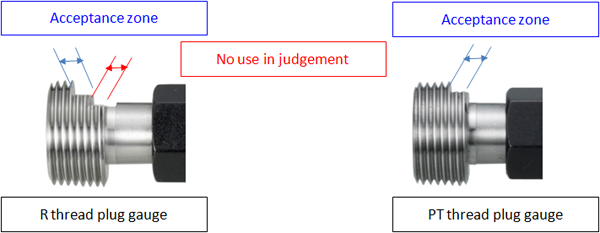
There are 2 step notches on the R taper thread plug gauge of taper pipe thread plug gauge. How to use them? Why is there only 1 step notch on the PT taper thread plug gauge?
There are 2 steps notches on the taper thread plug gauge of R gauges and 1 step notch in small end of the thread is used in acceptance judgement. The second step of the large end is for determine the size.
For taper thread plug gauge of PT thread, large end is used for determining the size of gauge diameter and the notch is only 1 step.
Please refer to JIS B 0253 : 1985 for details.

In measuring taper pipe thread, can the products with PT standard be inspected using taper pipe thread of R standard? And why PS or Rp are checked using R taper thread
Since the basic size of PT and R standard products are the same, there is a case where the use the products of PT and PR are confused. The difference arises in the judgment because the shape dimension are different between conventional JIS standard of PT and ISO based JIS of R standard.
Using gauge with the specifications described on the drawing instructions is recommended.
The inspection of male thread, which is connected to the female threaded product of parallel pipe thread PS and Rp, is conducted using taper pipe thread plug gauge of PT and R, respectively.
When acceptance test is carried out using owned maintenance check fit thread plug gauge, the plug can not be inserted into the ring. Is this ring gauge a defective product?
The check fit thread plug gauges are manufactured under their allowable tolerances. In some cases, your owned plug gauge could not be inserted into the rings, depends on the performances of the plug gauges. Generally, the thread rings are inspected using manufacturer owned check fit plug gauge before delivery and hence it is not a defective product even your owned plug gauge can not be inserted in an acceptance test.
An acceptance test should be carried out using the manufacturer owned check fit thread gauge.
Why GO thread plug gauge (GP) can not be inserted into the newly produced thread ring gauge (GR)?
In positional relation of size setting of limit thread gauge for maintaining the interchangeability between male and female threads, the GO thread ring gauge and GO thread plug gauge does not fit into each other. Such the difference on the setting should be understood and you can check the specification in the document standard.
When the products are inspected using NOT GO thread plug gauge, the gauge could be inserted into the products under some turnings. Is there any easy method to check whether NOT GO thread plug gauge does not turn more than 2 turning?
For NOT GO thread plug gauge, please insert into the product until a position at which the gauge is stopped. Then return back to remove the plug gauge from the stopped position until the gauge is completely removed from the product. Count how many turnings it has to remove completely the gauge.
The same method can be applied to the NOT GO thread ring gauge.
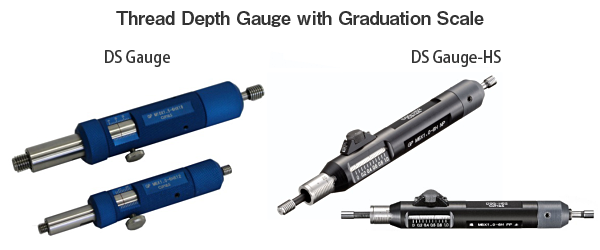
How to measure the depth of the threaded part of the threaded holes?
The depth of threaded part of holes can be measured easily using thread depth gauge with graduation scale. It is necessary to clarify whether the depth is measured from completed thread or from the edge face of the threaded part. Please contact us for such the gauges which suitable with the product shape.

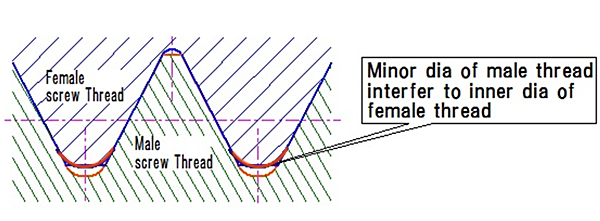
When conducting acceptance test of the threaded part, GO thread ring gauge could not be inserted. How it can happen since the major diameter, pitch diameter were manufactured according to JIS standard?
This could happen if minor diameter of the male threaded part and its shape are poor, which causes interference between the root of the threaded part and minor diameter of thread ring gauge. These could be caused by an improper shape of ridge tip of dies or R nose of screw cutting tool.
If there is no problem on the tools, basic profile such as the pitch, thread angle or the pitch diameter is too close to limit value, may be the cause.
We recommend to use thread gauge when you are producing the threaded products.

