Questions on Screw Thread Gauges
Please click the questions below.
What is the pitch diameter of a screw thread?
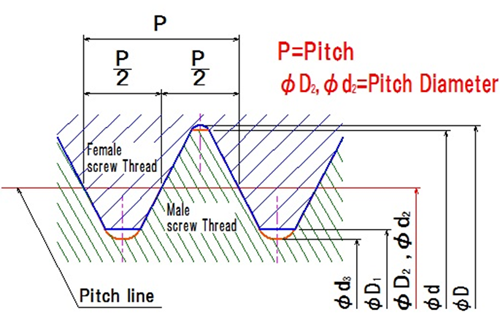
The basic profile of screw thread consists of major diameter, minor diameter, pitch diameter, thread angle, pitch etc.
Among them, the pitch diameter and its tolerance plays important role.
The pitch diameter (d2 or D2) of a particular thread, internal or external, is the diameter of a cylindrical surface, axially concentric to the thread, which intersects the thread flanks at equidistant points.
Knowledge of pitch diameter determines the position of the sharp-V thread form, the sides of which coincide with the straight sides of the thread flanks. If the pitch diameters of an internal and external thread are exactly matched, there should be no play at all between the two as assembled.
In general, screw thread gauges inspect this pitch diameter.

Can we inspect the threaded shaft product having tolerance of 6g (Class 2) using screw thread ring gauge having more tight tolerance of 4h (Class 1) ?
The answer is NO.
Class tolerance of screw thread shows the position of tolerance, not the quality of the products.
The tolerance of the screw thread gauges must be chosen according to the tolerances of the products.
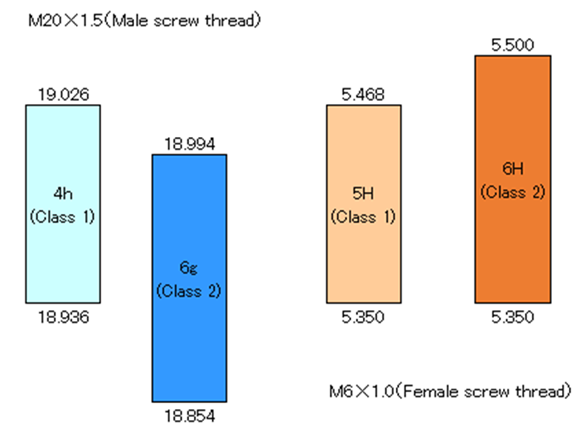
For your reference, there are the example of limit size and its tolerance of the pitch diameter of class 1 and 2 as below.
Product: Male screw thread
| M20×1.5 -4h (Class 1) | 18.936/19.026 (0.090) |
|---|---|
| M20×1.5 -6g (Class 2) | 18.854/18.994 (0.140) |
Product : Female screw thread
| M6×1.0 -5H (Class 1) | 5.350/5.468 (0.118) |
|---|---|
| M6×1.0 -6H (Class 2 ) | 5.350/5.500 (0.150) |

In conventional JIS, metric thread gauges and unified thread gauges are classified into manufacturing/working and inspection use, what is their difference? Does ISO based JIS also have such the classification?
In conventional JIS, metric and unified thread gauges of NO GO side are classified into working and inspection use. But for GO side, it is not classified as NO GO.
For manufacturing/working use, the gauge tolerances are taken at inner side of its allowable limit, while for inspection use are at outside/bigger side. Such tolerance setting will make the products that passed when inspected using working use gauge will also pass when inspected using the inspection use gauge.
In ISO based JIS gauges, there is no such classifications for both GO and NO GO side, the gauges are common either for inspection or working use gauges. Gauge tolerances are similar to those of inspection use gauge in conventional JIS.
We recommend you to purchase the thread gauges from the JIS authorized maker, which the quality is guaranteed.
How is the wear allowance provided of wear limit of thread plug gauge M20x1.5 GPNP-6H?
For M20x1.5 GPNP-6H size, minimum size of GO side is Φ19.0325 and wear limit is Φ19.0205, so the wear allowance is 0.012mm. For NO GO side, minimum size is Φ19.2160 and wear limit is Φ19.2100, so the wear allowance is 0.006mm.
Due to its use, the wear allowance of NO GO is set less than that of GO side.
Thread gauges are subject to wear during use. When wear causes size fall below the minimum size but within the wear limit, the gauge yet can be used properly. However, bear in mind that the size is approaching its limit.
What is a standard thread gauge and how to use it?

Standard screw thread gauge is a pair of thread plug and ring gauge which engaged tightly to each other.
Differ with limit thread gauge which inspect the products using GO and NO GO side, the acceptance of the products are determined from the looseness of the gauges when screwed into the products.
Since the size of screw thread gauges are close to those of size of basic profile and size of screw thread, it can be used as master for comparative measuring instruments.
These gauge are suitable for checking the product which require tight engagement at a relatively reduced cost compare to limit gauges.
However, compare to the limit thread gauge, standard thread gauge has limitation such as the wear of each gauge can affect the engagement/fitting condition with the product, has no NOT GO function.
What kind of thread pipe gauges, taper thread pipe gauges are commonly using now?
There are G threads introduced from ISO in parallel pipe threads (ISO based JIS). PF Thread Gauges of conventional JIS are shown in ISO based JIS annex, but for some sizes and classes are excluded.
Please refer to JIS B 0202 for details.
For taper pipe thread gauges, there are R screw thread introduced from ISO in JIS.
Taper female thread fits with R male thread is called Rc female thread and which fits with parallel pipe female thread is called Rp parallel pipe female thread.
PT thread gauges of conventional JIS are shown in ISO based JIS annex, but for some sizes and classes are excluded.
Parallel pipe female thread fits with PT male thread is called PS female thread.
Please refer to JIS B 0203 for details.
There is A/B marking on the GO side of PF parallel pipe thread plug and ring and ring of G standard. What does it mean?
There are 2 class: A and B in the parallel pipe threads. Class A and B are used in common for GO side and hence the A/B marking is also typed. But there is no class in the plug gauge of G standard.
